Geometric Shapes: The Key to Stunning Graphic Designs
Creating stunning geometrical designs and brand identities is a staple for graphic designers. But, not every designer has the same approach to creating shapes in Illustrator. That’s why we’re sharing a simple and effective trick that can make the process a lot easier. This guide is designed to help both beginners and advanced users to create geometrical shapes or brand identities with ease in just a matter of minutes.
Step-by-Step Guide to Crafting Geometrical Shapes
This tutorial will provide you with a step-by-step guide to creating precise and symmetrical shapes that can be used for a variety of graphic design projects. With our guide, you will learn how to incorporate your own creative touch and make your designs truly stand out. Whether you’re working on a new project for a client or creating designs for your own business, this guide will provide you with the essential tools and techniques needed to create stunning and impactful designs.
By the end of this tutorial, you will be equipped with the skills and knowledge necessary to take your design skills to the next level. So why wait? Start learning today and unleash your full design potential!
Let’s draw some Geometric Shapes in Illustrator
Step 1:
Begin by creating a new file. Click on “File” and then “New” (Ctrl+N for Windows, Command+N for Mac).

A pop-up window will appear, prompting you to set the artboard size.

Step 2:
Choose the Rectangle tool (M) and click anywhere on the artboard. A pop-up window will appear showing width and height options. Set both of them to 200pt to create a perfect square, then press the OK button.

Step 3:
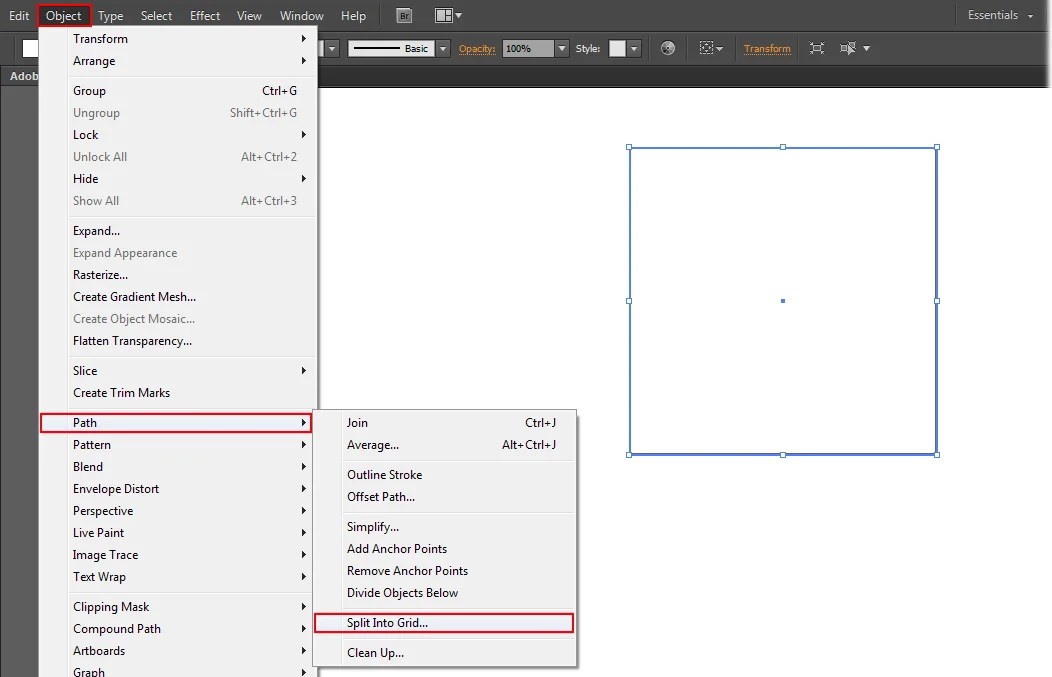
You now have a square. While the square is selected, navigate to Object > Path > Split into Grid.

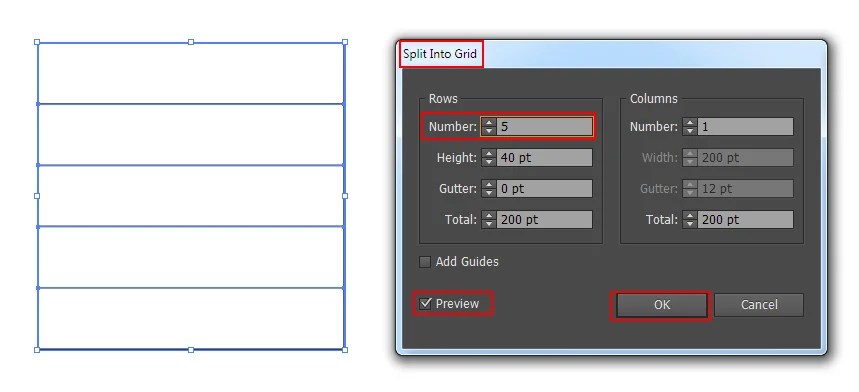
Upon clicking ‘Split into Grid’, a pop-up box will appear with options for rows and columns. In this box, set the number of rows to 5, then click OK. This will divide your square into 5 rows. Next, select the entire square and group all 5 rows together by pressing ‘Ctrl + G’ on a Windows computer or ‘Cmd + G’ on a Mac.

Step 4:
After setting aside the square, go to the Rectangle tool (M) and select the Polygon tool option. Create a hexagonal shape with no stroke and choose a color of your own preference. (Note: On a Mac, use the Command key instead of Ctrl)

Step 5:
With both the grid square and hexagon selected, align them. You’ll notice that the hexagon is smaller than the square. Using the Direct Selection Tool, select the lower middle point of the hexagon, hold down the Shift key, and bring it to the same level as the square as shown in the figure.

Step 6:
Using the Selection Tool, select the square and then right-click with your mouse. From the options that appear, select Arrange > Bring to Front to make the square appear above the hexagon.
 Step 7:
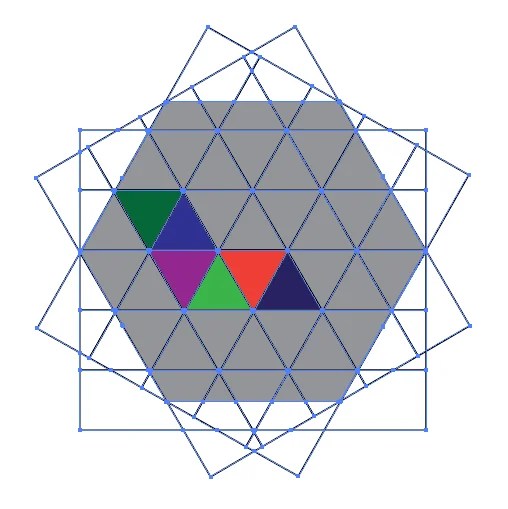
Using the Selection Tool, select the grid square and press Ctrl+C and then Ctrl+F on your keyboard to make a copy of the square. Next, rotate the copied square by -59.77 degrees. You will now have 2 squares.
Repeat this process by pressing Ctrl+F twice on the second square to make another copy, and then rotate it by -119.51 degrees. This will give you a total of 3 squares.
Finally, adjust the position of the first square slightly upward or downward to reveal triangle shapes.

Step 8:
Using the Selection Tool, select all 3 squares and the hexagon shape.

and use the Shape Builder Tool (Shift+M).

Now go to swatches and pick any color, then click on any triangle. The triangle has that color that you pick from swatches.

Now pick another color and do the same.

Step 9:
I make an “N-shape” with different colors.

Step 10:
Now click on any colored triangle Ungroup them with the Right Click of your mouse. Select the portion which you do not require as I did and Delete them.

Final Preview:
After doing all the processes/steps you will have a perfect alphabet shape.

With this simple trick, you can easily create unique geometric shapes and alphabets in Illustrator. Whether you’re a beginner or an experienced graphic designer, this technique will make the process of designing brand identities or logos a breeze. The best part is, it only takes 5 to 10 minutes to achieve a professional-looking design. In this tutorial, we’ll show you step-by-step how to create geometrical shapes with ease, and as a bonus, we’ll even provide an example to get you started.

NOTE:
While coloring triangles the stroke option must be OFF.

Hopefully, this tutorial on creating geometric shapes will help you to create different designs with ease. Soon I’ll also share a video tutorial to make the process of creating geometric shapes even more convenient for you.

Leave a Reply